Wednesday, March 28, 2018

How to Make Blu-ray/DVD Playable on Samung Galaxy S9/S9+

The Samsung Galaxy S9 and Galaxy S9 Plus have been launched for several days since March 16, let's have a look at the new Android phones. You won't find a bigger and better Android phone than the Samsung Galaxy S9 Plus, thanks to its oversized 6.2-inch curved screen and low-light-defeating dual-lens camera. Sure, it looks exactly like last year's S8 Plus, but it does fix the fingerprint sensor location and speakers (now stereo). 

s9

With this smartphone in hands, transferring all your Blu-ray/DVD collections to it for watching when you're out for travelling to kill the boring time. Maybe, many people will say they can purchase the BD/DVD movie form the online movie store, it will be a waste if you have already had the same BD/DVD disc in hand.

There are lots of Blu-ray/DVD ripper which can copy and convert the movies form the plastic to Samung Galaxy S9/S9 Plus playable movies. However, the point is how to get the best one in the market. You are in the right place, Pavtube BDMagic | for Mac (review) always stands out from its competitors, and recently, it has upgraded to v4.9.2, added support for Blu-ray AACS MKB v63. It allows you to convert Blu-ray/DVD to H.264/H.265 MP4, H.265 MKV, AVI, MOV, M4V, WMV, WAV and more for playback on Samsung Galaxy S9/S9 Plus, iPhone X/8/8P/7/7P, iPad, Xbox one, PS4 Pro and other popular devices.

To get the best video and audio playback effect on Galaxy S9 (plus), you can use the "Crop" function to adjust output aspect ratio to let it fit with your smartphone screen display, flexibly tweak the output video codec, bit rate, frame rate, resolution or audio codec, sample rate, bit rate, channels, etc. With this perfect tool, you can also flexibly set subtitles on your own. You can select desired subtitles from original Blu-ray/DVD movies, enable forced subtitle option to disable the traditional subtitles while still preserving the subtitles that translate foreign language speaking parts. If the original Blu-ray/DVD movie doesn't contain you wanted subtitle languages, you can download a subtitle file in your first language and then add subtitles to your movie files.

Step by Step to Rip and Play BD/DVD Movies on Samsung Galaxy S9 (Plus)

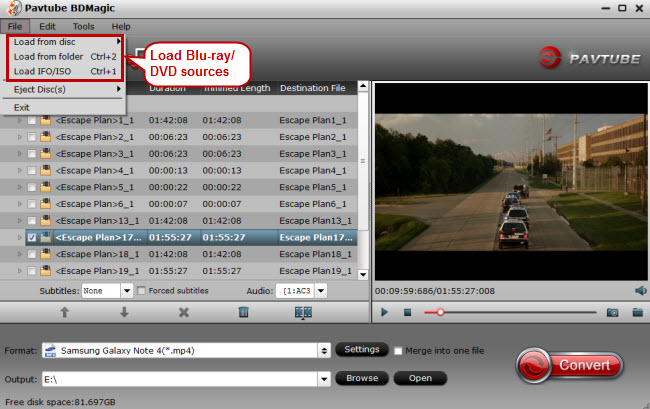
Step 1: Load movie disc into the program

Launch the program on your computer, click "File" > "Load from disc" to load commercial Blu-ray/DVD disc with copy protection to the application.

load dvd

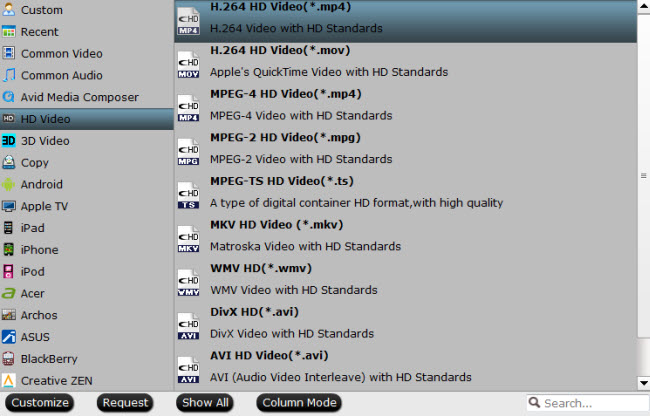
Step 2. Select output video format for Galaxy S9/S9 Plus

Press “Format” drop-down menu and then select a video container format that the Galaxy S9/S9 Plus supports like MP4, WMV, AVI, etc. You can also select HD MP4, HD WMV, HD MKV, HD FLV, etc format from "HD Video" category.

mp4

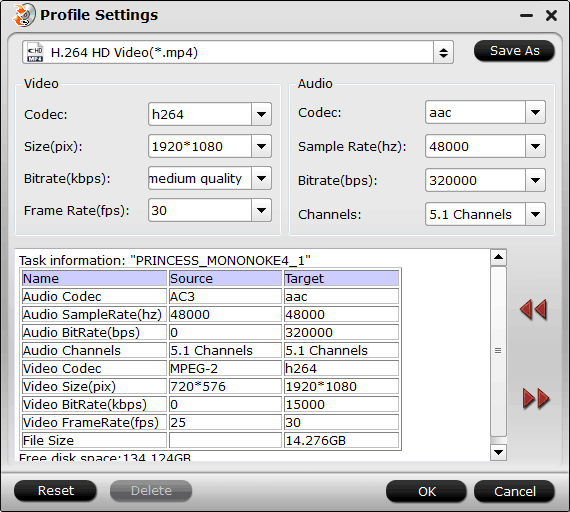
After that, click the "Settings" button to adjust the output parameters including “resolution”, “bitrate”, “frame rate”, and “codec” to make the output video play best on your Galaxy S9/S9 Plus.

adjust mp4 settings

Step 3: Start Blu-ray/DVD to Samsung Galaxy S9/S9 + ripping process

After you have finished all the settings, go back to the main interface, press the right-bottom "Convert" button to start to convert Blu-ray/DVD to Galaxy S9/S9 + with original video/audio quality.

When the conversion is completed, click "Open output folder", a window will pop out with all your converted files. Then feel free to transfer converted files to Galaxy S9/S9 Plus for playback anytime anywhere. 

Galaxy S9 vs S9+

S9 and S9+’s obvious difference is the display size. Galaxy S9’s display is 5.8 inches while Galaxy S9+’s display is 6.2 inches and with the increased size comes an increase in power. The S9+ has a 3,500 mAh battery where the S9's battery is 3,000 mAh. Additionally, the S9 will give you 4GB of RAM while the S9+ will give you more with 6GB of RAM. Don't worry both of them support microSD cards for additional storage expansion of up to 400GB.

However, the biggest noticeable difference between the two and what makes the S9+ stand out is its dual cameras. The S9 features a single lens camera while the S9+ features a dual lens camera that offers dual optical image stabilization and 2X optical zoom. Both feature super slow mo though, so we got you covered!

So what makes Galaxy S9 and S9+ better than Galaxy S8 and S8+? The S9 and S9+ have a faster processor, more memory, and larger screens to name a few of the improvements from the S8 and S8+. Want to know all of the changes, check it out for yourself.

Here are the specs:
Galaxy S8 Specs
Galaxy S8+ Specs

Galaxy S9 Specs 
Galaxy S9+ Specs

Thursday, March 22, 2018

Compress DJI Mavic Air 4K to 1080p for After Effects Editing

A marvel of engineering and design, the Mavic Air was built to go wherever adventure takes you. Inheriting the best of the Mavic series, this ultraportable and foldable drone features high-end flight performance and functionality for limitless exploration. The Mavic Air is the most portable DJI drone to house a 3-axis mechanical gimbal, with its angular vibration range reduced to 0.005°. Set in a triangular formation, gimbal dampeners help create even steadier shots. Best of all the Mavic Air shoots video at an incredible 4K 30 fps, recording at 100 Mbps to capture every second with UHD quality.

It is a wonderful idea to input the DJI Mavic Air captured 4K footage into Adobe After Effects for further editing. However, it will be CPU comsuming if you load DJI Mavic Air 4k into After Effect and try to render the final file. If you say you have owned a very power computer and can get this job done, okey, how about the final render file? It can be very easy to say that its size will be very very large after adding vdieo effects to it. So today what we are gonna discuss is how to compress DJI Mavic Air 4k to 1080p for better postproduction, and compress the large render files for better sharing.

Part 1. How to Compress DJI Mavic Air 4K to 1080p before After Effects Editing

To compress DJI Mavic Air captured 4k footage before inputting into After Effects, you have a good choice - finding a smart assistant which comes as a super compressor. Pavtube Video Converter Ultimate always stands out from it competitors will never let you down. It allows you to input 4K MOV, 4K MP4, 4K AVCHD, 4K MKV and output MKV, MOV, MP4, AVI, M4V etc with 4K/2K/SD/HD resolution, moreover, customizing video parameters like video/audio codec, resoluiton, bit rate, frame rate, channels etc are available here. Apart from video rosolution, video file size also depends on video bit rate, get smaller video size by lowering the bit rate.

Quick Guide to Compress DJI Mavic Air 4K to 1080p before After Effects Editing

Step 1: Load DJI Mavic Air 4K video into the program.

Start the program on your computer, click "File" menu and select "Add Video/Audio" or "Add from folder" to import DJI Mavic Air 4K video.

Load DJI Mavic Air 4K video

Step 2: Define output video format

Click "Format" bar, from its drop-down options, choose the best compatible uploading format from "Common VIdeo" > "H.264 High Profile Video(*.mp4)". You also can choose other video formats according to your needs.

Output YouTube best uploading 4k formats

Step 3: Compress DJI Mavic Air 4K to 1080p

Hit "Settings" to open the "Profile Settings" window, here you can adjust the output video codec, resolution, bit rate, frame rate and audio codec, bit rate, sample rate and channels. To compress 4k to 1080p, just type 1920*1080 in Size blank. If you prefer smaller video size, lower the video bit rate can help you achieve this goal.

Output YouTube best uploading settings

Step 5: Start the conversion.

Start to compress DJI Mavic Air 4K video to 1080p conversion by hitting the right bottom convert button, when the conversion is over, you will have no limitation to upload DJI Mavic Air 4K video to After Effects. You will be surprise about the smooth editing process.

Part 2. How to Compress After Effects render file size for sharing

Above is the tutorials to help you compress the DJI Mavic Air 4k to 1080p for smooth editing. Almost all After Effects moive making lovers know that, although the file you input into Adobe AE is very small, the render file will be larger larger larger than what you input, cause you have done the footage's postproduction. So how to reduce the render file size? Here are two ways to help you solve the problems.

Method 1. How to reduce the render file size in Affter Effects

To reduce render file size in Affter Effects is to change the format to H.264, but how? Keep reading.

To render H.264 it's actually very easy.

  1. From your Project window, select the sequence you wish to render.
  2. Right click->Export Media (or File->Export Media)
  3. In the Video tab, select H.264 for format

Then, in the basic video settings below, you can change to smaller-than-original resolution, low bit rates, etc.

Method 2. How to reduce the Affter Effects render file size via Pavtube tool

If you are not faniliar with the operation by reducing in After Effects, this method will be very easy for you. Open Pavtube Video Converter Ultimate and load the render file into it, then define the output format you like just like we just do above, then click Settings on the UI, screenshot like below.

Output YouTube best uploading settings

Now you are able to adjust the output video codec, resolution, bit rate, frame rate and audio codec, bit rate, sample rate and channels. Apart from changing video resolution, you also can lower the bit rate to make the render file smaller.

Up to now, you may have no trouble to play the DJI Mavic Air 4k with any devices, or upload to Youtube Facebook, Twitter for sharing with thousands of net friends.

Friday, March 16, 2018

How to Convert HD MTS to M4V/MOV for Playback on iPad Series

An MTS file is a video file saved in the high-definition (HD) MPEG Transport Stream video format, commonly called "AVCHD". MTS files are often used by Sony, Panasonic, and other HD camcoders. It is worth to say that MTS files can not be played directly by most media player or reconginized by most tablets, smartphones because of its video audio codec. So if you want to sync some MTS files to your iPad with iTunes for sharing with friends, how to do?

convert mts to m4v for ipad air apple tv 3

Converting MTS to iPad supported video formats could solve this problem, for example, converting MTS to M4V/MOV will be a good way. You can search MTS to M4V/MOV converter in Google and pop up hundreds software in the page. The point is how to get the best one. Pavtube Video Converter Ultimate | Mac (review) always stands out from its competitors which could convert HD MTS to M4V, MOV with just 3 steps.

Moreover, apart from converting MTS to M4V/MOV, it also allows you to import Blu-ray/DVD, MOV, AVI, MKV, AVCHD, VOB with resolution of 4K/2K/HD/SD to any formats you need including MOV, M4V, H.264/H.265 MP4, 3GP, M4V and more. For those people who want to do some postproduction to the MTS footage, video editing is also availabe here.

You are able to flip MTS video horizontally or vertically, rotate video clockwise or counterclockwise to get it displayed in the right angle, trim or cut MTS video to remove unwanted parts or segments, crop video to cut off unwanted black borders or area, personalize MTS video with video/image/transparent text watermark, split large video into small parts by file size, count or length, merge separate video clips into one, adjust picture effect like brightness, contrast, saturation or apply special rendering effects like Gray, Flip Color or Aged Flim, etc to your video or add external SRT/ASS/SSA subtitles to videos. To sum up, its features are beyond your imagination. Have a try!

How to upload recorded HD MTS videos to iPad Series

Step 1. Import captured MTS videos

Download and open up recorded HD MTS videos to this MTS to M4V/MOV converter by clicking “File” > “Add Video/Aideo.”

add mts video to mts converter

Step 2. Choose M4V as output video format

All models of iPad support M4V/MOV formats, just go to the format list to find M4V option, select "M4V-MPEG-4 Video(*.m4v)" or "MOV-QuickTime(*.mov)"-->"Common Video", or "H.264 HD Video(*.mp4)" from "HD Video" category.

output iTunes M4V format

Step 3. Edit recorded HD MTS videos (Optional)

Go to "Video Editor" window to create your personal videos by trimming, cropping, adding watermarks and special effects.

edit mts video

Step 4. Convert MTS to M4V for iPad

One click on the red button “Convert” to start to convert recorded HD MTS videos to iPad compatible video format - M4V. After conversion, transfer the converted MTS videos to iPad .

Tuesday, February 27, 2018

Compress MKV Files with No Quality Loss

Most movies or TV shows especially some high definition sources streamed over the Internet are using the MKV file extension. The problem is that MKV file is usually in large file size and take a lot of your hard drive space, then you may come the need to compress MKV files into smaller file size. Although there are many programs on the market can do the MKV file compressor job for you, however, you may find that some of them are too complicated to operate, others may won't ensure you to produce a high quality smaller video file. following part will introduce you some effective way to reduce MKV file size with our intuitive and simple to use MKV file compressor - Pavtube Video Converter Ultimate, which helps to efficiently shrink MKV file size by adjusting video container, resolution, frame rate, bit rate, frame rate, video length, etc.

Ways to compress MKV file size

Solution 1: Compress MKV to small container file format such as WMV, FLV

Both FLV and WMV files are smaller container file format for compressing files. For those people who wish to send file via email or store the files on your hard drive, WMV can be your best choice. If you have the need to share files over the popular video sharing sites such as YouTube, Vimeo, Facebook, etc, FLV will do the job best.

Solution 2: Change MKV file video resolution, bit rate, frame rate, etc

Adjust MKV file resolution: The higher resolution of a video file, the clearer effect of the video picture. However, you may also get a large file size. You can change the video resolution of a 4K video to 1080p or 720p with the resolution of 1980*1020 or 1080*720 or adjust a high definition video to small file size video with the resolution of 640x480 or 640x360, etc.

Change MKV file bit rate: Lower the MKV video video bit rate will help to decrease the video file size, therefore, always make sure to make a good balance between file size and quality.

Tweak video frame rate: You can reduce your video file size by lowering the frame rate of your video with 10-15 fps. But reducing the frame rate will also effect the smoothness of the video playback. You will need to experience to find the lowest accepted frame rate value.

Solution 3: Trim/Crop MKV file

For those people who don't want to suffer any quality loss, the best way to trim MKV file length by cutting off unwanted parts or segments and leave only your unwanted parts or crop off the unwanted black bars or size area around the video frame.

Related article: Compress Video for Email YouTube Vimeo Facebook | Compress MP4 Files Windows Mac | Top iPhone Android Video Compressor

Shrink MKV file size with Best MKV file compressor

The best MKV file compressor - Pavtube Video Converter Ultimate we mentioned above can better compress MKV files with the different solutions listed above. You can not only change the MKV container to WMV or FLV for convenient email or online sites sharing, but also lower the video resolution, bit rate, frame rate flexibly with accepted value in the program's "Profile Settings" window but also trim the video length or crop the video file size to get a smaller file size video with no quality loss.

For Mac users, you can switch to download Pavtube iMedia Converter for Mac to perform MKV file size shrinking job on macOS High Sierra, Mac OS X El Capitan, Mac OS X Yosemite, Mac OS X Mavericks, etc.

Get Pavtube Video Converter Ultimate with 20% off discount, coupon codec: 45K2D47GJH

Step by Step to Compress MKV File Size with Best Quality

Step 1: Load MKV files into the application.

Download the free trial version of the program. Launch it on your computer. Click "File" menu and select "Add Video/Audio" or click the "Add Video" button on the top tool bar to import source MKV video files into the program.

Load MKV video

Step 2: Output a file format with small file size.

Output a smaller file size

Step 3: Adjust output profile parameters.

Change output profile parameters such as frame rate, bit rate and resolution to reduce mp4 file size. Please bear in mind, excessive reduction of the parameters will bring about quality degradation. This program can keep a good balance between the file size and image quality. You can simply leave the parameter settings unchanged after choose the output format.

Adjust output smaller file size

Step 4: Trim or crop MKV file size.

Select one item on the file list to active the pencil like "Editor" icon on the top tool bar, hit the "Edit" icon to open video editor window.

Trim: Click "Trim" button, you can drag the slider bars to include the segment you want to remain, click the left square bracket to set start point, and click the right square bracket to set end point when previewing the video or directly input specific values to "Start" and "End" box.

Trim MKV video length

Crop: Hit the "Crop" tab, drag the green dash line around the video to remove the black edges in the video frame.

Crop MP4 video file size

Step 5: Start MKV file compression process.

Specify an output folder on your computer for storing the converted files. Then hit right-bottom "Convert" button to start to compress MKV files on your computer.

When the conversion is completed, you will have no problem when do file uploading or emailing with compressed MKV file size.

Tuesday, February 20, 2018

Edit MOV Files in HitFilm Pro 2017

HitFilm Pro 2017 is a unique mix of video editing, visual effects and 3D compositing tools all in one product. It includes 3D object rendering, a powerful particle simulator, over 500 customizable visual effects and presets, professional color grading, industry - standard BorisFX titling and over 150 creative plugins for use in other video software.

Import and edit MOV files with HitFilm Pro 2017

Have some MOV files downloaded from online sites or shot with your camera, camcorder, smartphones and wish to load them into HitFilm Pro 2017. But every time when you try to import a MOV file, it just ask you to install QuickTime player, which you didn't install because I found it is just for Mac.

Related article: Import AVCHD/MTS/MXF/MKV to HitFilm | Import AVI to HitFilm

Why HitFilm Pro 2017 not import MOV files?

After searching for HitFilm supported file formats, we can see that it can native import the following file types:

Video

Audio

AVCHD (M2T, MTS, M2TS)
AVI (including 10-bit and 12-bit GoPro Cineform (Windows only)
DV & HDV
MP4 (AVC/H264 & AAC)
MPEG-1 & MPEG-2 (TS, PS, MPE, MPG, MPEG, M2V)
MXF (DVCPro HD)
QuickTime MOV (including 10-bit and 12-bit Pro-Res (requires that an up to date version of QuickTime is installed on your computer)
WMV

AAC
MP3
M4A
MPA
WAV
WMA

From above list, we can see that HitFilm Pro 2017 only supports to handle QuickTime MOV files, in addition, you will need to install the latest QuickTime player version on your computer. It also means that if you will fail to import other types of QuickTime MOV files into HitFilm Pro 2017.

Transcode unsupported MOV for HitFilm Pro 2017

To fix the format or codec incompatible issue, you can download a third-party video conversion app. If you are looking for a powerful yet simple to use application to get the job easily completed, we highly recommend Pavtube Video Converter to you. The program has full importing support for 4K/2K/HD/SD MOV files encoded with various different video and audio compression codec. Thanks to its batch conversion mode, you can load multiple MOV files into the application for conversion at one time. The tool can assist you to efficiently transcode unsupported MOV to HitFilm editable formats listed above with perfect quality and super-fast conversion speed.

Besides MOV, you can also use this application to convert other unsupported files such as MKV, H.265, XAVC, XAVC S, etc to HitFilm Pro workable editing formats listed above.

For Mac users, please go to download Pavtube Video Converter for Mac to complete the conversion on macOS High Sierra, macOS Sierra, Mac OS X El Capitan, Mac OS X Yosemite and Mac OS X Mavericks, etc.

Step by Step to Convert MOV for HitFilm 2017 Editing

Step 1: Load MOV files into the application.

Download the free trial version of the program. Launch it on your computer. Click "File" menu and select "Add Video/Audio" or click the "Add Video" button on the top tool bar to import unsupported MOV video files into the program.

Load MOV video files into the application

Step 2: Define the output format.

Clicking the Format bar, from its drop-down list, select one of HitFilm Pro 2017 editable file formats such as "Divx AVI - Audio Video Interleaved (Divx)(*.avi)" under "Common Video" main category.

Output HitFilm Pro 2017 supported editing formats

Tip: Before conversion, you can click the "Settings" icon to customize the output video/audio settings Bitrate such as video codec, bit rate, resolution and frame rate or audio codec, bit rate, sample rate and channels, etc.

Step 3: Begin the conversion process.

After all setting is completed, hit the "Convert" button at the right bottom of the main interface to begin the conversion process from MOV to HitFilm supported editing formats conversion process.

When the conversion is finished, click "Open Output Folder" icon on the main interface to open the folder with generated files. You'll then have no problem to work the converted MOV files with HitFilm 2017.

Tuesday, February 13, 2018

Edit MXF in HitFilm Pro

Have shot some MXF files with your Sony XDCAM, Panasonic P2 or Canon XF camera and wish to load them into the fastest video effects software - HitFilm Pro for some professional post editing workflow. However, although HitFilm Pro has included native import support for MXF files, however, a lot of people still complain that they encounter many problems when editing MXF file with HitFilm Pro.

"I am trying to import some video files in the .mxf format but when imported they are just showing a green screen in hitfilm. The original shots are in 180fps 1080P HD but I believe the codec is the main problem with the files (AVC/H.264)."

"I can't import MXF X-AVC recorded by Sony Z100. Same for 4k CineForm AVIs. HitFilm Pro 2017 just ignores these files when trying to import."

Why HitFilm Pro not fail to read MXF files?

From HitFilm Pro supported import formats, we can see that HitFilm Pro is only able to handle DVCPro HD MXF files. It also means that you will fail to load other MXF file types such as P2 MXF, XDCAM/XDCAM HD MXF into HitFilm Pro.

Transcode unsupported MXF for HitFilm Pro editing

To load P2 MXF or XDCAM/XDCAM MXF into HitFilm Pro for editing, you will need to perform a format transcoding process. Here, you can easily turn to our best Mac MXF Converter - Pavtube iMXF. The program has full importing support for both 4K and HD MXF files shot with Sony XDCAM/XDCAM HD, Canon XF, Panasonic P2 and also Panasonic DVCPro HD. The application can assist you to transcode MXF to HitFilm Pro supported editing formats listed below:

Video

Audio

AVCHD (M2T, MTS, M2TS)
AVI (including 10-bit and 12-bit GoPro Cineform (Windows only)
DV & HDV
MP4 (AVC/H264 & AAC)
MPEG-1 & MPEG-2 (TS, PS, MPE, MPG, MPEG, M2V)
MXF (DVCPro HD)
QuickTime MOV (including 10-bit and 12-bit Pro-Res (requires that an up to date version of QuickTime is installed on your computer)
WMV

AAC
MP3
M4A
MPA
WAV
WMA

Apart from HitFilm Pro, this beneficial application also assists you to convert MXF to other editing software such as Final Cut Pro X, iMovie, Premiere Pro CC, Avid Media Composer, Davinci Resolve, etc specially optimized editing codec such as Apple Prores, DNxHD, Apple Intermediate Codec, etc.

Related article: Edit MP4 with HitFilm Pro | Import H.265 to HitFilm Pro | Import Video to HitFilm Ultimate

For those people who wish to preserve the multiple audio tracks or channels, you can use this application to directly export MXF to multi-track MKV/MP4/MOV formats. If you try to load the MXF files to Final Cut Pro X, you can also output Multi-track Apple Prores foramt with multiple tracks and channels, etc.

For Windows users, please switch to download Pavtube MXF MultiMixer to convert MXF for HitFilm Pro 2017 editing on Windows 10/8.1/8/7.

Step by Step to Convert MXF for HitFilm Pro Editing

Step 1: Load MXF files.

Download the free trial version of the program. Launch it on your computer. Click "File"menu and select "Add Video/Audio"or click the "Add Video"button on the top tool bar to import sourceMXF video files into the program.

Load source MXF files

Step 2: Define output file format.

Clicking the Format bar, from its drop-down list, select one of HitFilm Pro supported editing formats "H.264 HD Video(*.mp4)" under "HD Video" main category. You can also choose other editing formats according to your own needs.

Output HitFilm Pro supported editing formats

Adjust output profile settings

In the Settings window, you can choose or specify exactly the parameters you like. And in the Task information section, you can compare information from the original video and output video.

Adjust output profile settings

Step 3: Begin the conversion process.

After all setting is completed, hit the"Convert" button at the right bottom of themain interface to begin the conversion process from MXF to HitFilm Pro supported editing formats.

When the conversion is finished, click "Open Output Folder"icon on the main interface to open the folder with generated files. Then you will have no problem to edit MXF files with HitFilm Pro.

Tuesday, February 6, 2018

Import iPhone MP4 to Premiere Pro CC 2018

The newly released Premiere Pro CC 2018 has many great new features including the new Timeline search options and changes that make it easier to upload videos to YouTube. In addition, there are also new options for customizing labels, managing multiple open projects, working with Premiere Pro in virtual reality (VR), and more.

Have shot some HD or 4K MP4/MOV video encoded with either H.264 or H.265 compression codec with your iPhone and wish to get a high quality and high performance editing workflow of iPhone MP4 video with Premiere Pro CC 2018. Although PPC 2018 has included native editing support for the HD/4K MP4/MOV H.264/H.265 video shot with iPhone, however, it is well known that both the H.264 and H.265 codec used by your iPhone are not good editing format, they are very processor intensive when playing on the timeline, in addition, they are not good for doing effects editing such as color correction.

Transcode iPhone MP4 to PPC 2018 best favorable editing codec

The good news is that with a third-party iPhone Video Converter such as Pavtube Video Converter for Mac, you can easily produce PPC most preferable editing codec with perfect quality and super fast encoding speed. If your original iPhone MP4 video is encoded with SD resolution, we highly recommend you to use our program to export Premiere Pro CC specially optimized MPEG-2 editing codec, if your original iPhone MP4 video is shot wit HD resolution or 4K resolution, then Apple Prores codec can be the best choice.

Related article: Edit XDCAM MP4 in PPC | Edit Sony PXW FS5 4K in Premiere | Edit H.265 with Premiere Pro

The application supports batch conversion mode, so that you can load multiple iPhone MP4 video into the application for conversion at one time to save your precious time. What's more, it is also accompanied by an up-to-date Windows version - Pavtube Video Converter for you to complete the conversion on Windows 10/8.1/8/7.

Step by Step to Import and Edit iPhone MP4 Video with Premiere Pro CC 2018

Step 1: Load iPhone MP4 video.

Install and run the best iPhone Video Converter, and click the "File" button to load iPhone MP4 video into the application.

Load iPhone MP4 video

Step 2. Choose output format.

If your original iPhone MP4 video is shot with SD resolution, then just choose "Adobe Premiere/Sony Vegas > MPEG-2 (*.mpg)" as output format on the drop-down menu.

Output PPC 2018 specially optimized SD editing codec

If your original iPhone MP4 video is shot with HD or 4K resolution, then just choose "Apple Prores 422(*.mov)" under "Final Cut Pro" main category.

Output PPC best compatible HD/4K editing codec

Step 3: Begin the conversion process.

After all setting is completed, hit the "Convert" button at the right bottom of the main interface to begin the conversion process from iPhone MP4 to PPC 2018 best compatible SD/HD/4K editing codec.

When the conversion is finished, click "Open Output Folder" icon on the main interface to open the folder with generated files. Then feel free to import converted files to PPC 2018 for smooth posting editing workflow.